Thursday, December 15, 2011

Antique Music Paper Ornaments

Two weeks 'til Christmas, and I'm JUST now getting you my version of Miss Mustard Seed's Christmas ornaments that I've already been promising for two weeks.

Photo courtesy of Mustard Seed Interiors.


Let's just get right to it.  I use old hymnals for this project.  They're the perfect size, have plenty of double sided pages, and usually already have that nice aged look to them.  The ornaments I'm going to show you are pretty large, but you could easily use the same method with even smaller pieces.

To remove the pages, score as closely as you can to the binding, and gently pull out.  They should release pretty easily.


Take your sheet of music paper and fold it in half length-wise.


Fold it back and forth a few times, and it should easily tear apart.  If it doesn't, use scissors.  My paper is pretty delicate, and you don't want it to rip.


Starting at one end, accordion fold it like you used to when you were a little girl making paper fans.


Try and make your folds the same size.  They will end up like this when you're done.


Three half sheets will be full enough to make a full circle.  The accordion strips have to be attached together.  To do this, match up one end of one that points up with the end of another that points down.  


Use your hot glue gun to put a strip of glue along one side, match the two together, and press.  Be careful though- hot glue's really hot! Ask me how I know?...


Once you have a long strip of three half sheets, you'll wrap the end around and glue an end going up to an end going down as you did before.  If you happen to have two ends going in the same direction, just remove one of the last folds to get them in the right directions before gluing.  It should end up looking like this:


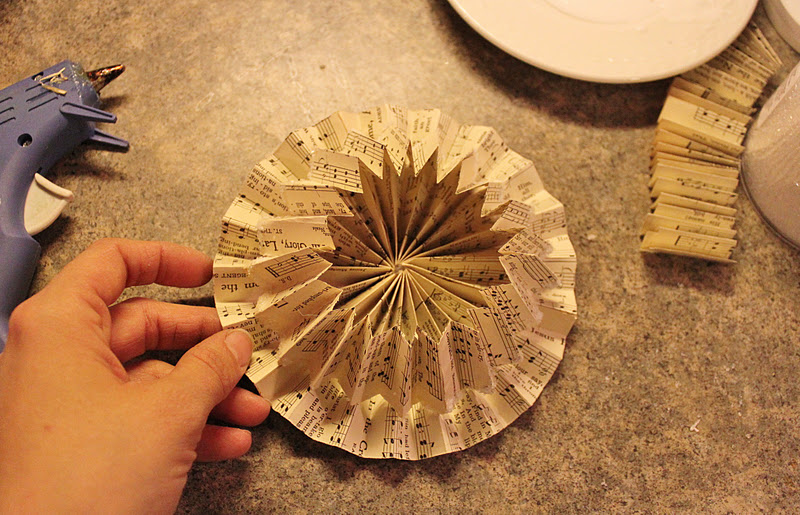
To get the flattened, circular fan shape, cup the circle in your hand and gently pull the top in as you push down.  It will gradually start to flare at the bottom.


Put a dab of glue in the center and hold it together, then turn it over and do the same on the opposite side.  You now have a flared circle.


You can put some glitter on the edges, put your string on it, and leave it as it is if you like at this point.  This is how Miss Mustard Seed's look.  I take it a few steps further. To make the inner circle, take one of the long set of three strips you've already made.  Push the accordion folds tightly together, and cut it in half.


Glue the ends together just as you did for the larger one.  Then gather it in your hands and dip the ends in glue.


Then dip the ends in your glitter.  I use a crushed glass glitter.


Then you'll need to sit it on top of the larger circle and push down, just like you did with the larger circle.  This sits it down in the grooves of the other circle so it looks more cohesive.


Very gently, push inward until the smaller circle closes in as well as it can on the larger one.  Put a dab of hot glue in the center, and hold it in place until it sets.


Pick up the two circles as a unit, and dip the outer circle in the glue, and then the glitter.


I finish the centers of mine with a set of vintage buttons attached with hot glue.


The last step is to attach your string.  I use a thin hemp string.  Punch a small hole through one of your seams so that you have double thickness for strength.  You want the hole to be big enough for your string to fit through, but not excessively big as to invite tears.


Tie a knot, and wait for your glue to dry.  It will dry clear, and you'll be left with pretty glass glittered edges.


Hang on your tree, and enjoy!


Hope you're all having a great holiday season!


Sharing at:
Savy Southern Style
2805 Potpourri Party

Tuesday, December 6, 2011

Go ask. You never know what response you'll receive!

Sometimes I get SO lucky.  At least I think I do...but then again, I pick up a lot of stuff that I think is completely awesome, but most people think belongs in the dumpster.

Anyway.  I'm lucky.  I'm sticking by that.

Yesterday on my way home from the store, I drove by the corner house down the street from me and saw three guys with a trailer, and lots of wooden pieces (not complete pieces as I usually use that term, but actual little bits and pieces) sticking out.  Since I'm really good at being creepy, I stopped, and struck up a brief conversation.  I really was curious about the house- it has looked totally empty ever since we moved in.  The guy had just bought it, it had been empty over five years, and he was cleaning it out.

I was able to get in that I love taking old chairs, tables, dressers, small children, etc.  Okay, maybe not small children, but I felt like I should be telling him I basically take anything.  He told me he had found two pieces that were worth fixing (not dry rotted) that he was planning to keep, but really had more projects than he needed anyway.  He ran inside and came back with a captains chair from a dining table.  It was completely gray, but after some Clorox wipes, and Old English, it's back to it's self.  And that leather seat is in perfect, beautifully aged, condition.


He also gave me an old drop leaf table, and I pulled three drawers from an old treadle sewing machine cabinet out of his trailer.  The table needs a lot of cleaning, and some work, but it will be a cute a cute little farm table when I'm done.

This morning, the guy called back (because I was good enough to give him a card).  He had found another chair.  He told me it needed an arm repaired and reupholstering, but that I was welcome to come check it out.  I did.  I took it.  It has really nice lines, but it is really REALLY nasty.  Like- has mold growing on it nasty.


(Hello, mold.  Yuck.  Also- you can see the table in the background!)

I assume that I'll have to throw everything but the frame in the garbage.  No one wants an old moldy chair, even if it's been dressed back up in new clothes.  BUT- when she is all dolled up again, what a knockout she's going to be!  I just love that because I stopped and was a little creepy (again) and forward (again), that I saved a great old piece from being crushed and filling up a landfill.

Anyway, there she, and the table, sit on my front porch until hubs is home and not on call to help me maneuver them into the garage (because Lord knows what's hiding in that cushion, and it is NOT coming in my house until it's totally stripped down!).  My neighbors love me, you know?

Did I mention the best part to this whole find?  Not only did the guy take my card, keep it, and use it...but he gave me all this great stuff for the absolute best price- free...not that I would have given much for any of it in the condition all the pieces were in in the first place, but it's always nice for someone to just offer something to you.  It's also great that he has my contact info, so if he gets into another house that has some goodies in it, he knows who to call.

Moral of the story.  Sometimes it feels weird, and creepy, to go up to a complete stranger and ask if they have anything you want on a whim, but it can be totally worth it.  If you do this though, just be careful, and don't go into any houses alone, etc.  Common sense, girls!


Now, what should I cover and paint my new little chair in?  Ideas?

(More soon-- promise you'll have the ornament tutorial this week so you can make some fab ornaments BEFORE Christmas!)

Tuesday, November 29, 2011

Update on the "Crummy to cute" house

The house is finished!  The carpet and tile is in, cabinets hung, all appliances (except the stove) hooked up and ready to go!

For a reminder on the before of this house, head over here: Nasty, nasty house!

I don't think I've seen a house in that bad of condition before.  It was really awful.  I can't claim to have helped with anything else other than what you've seen before, but my brother and cousin did a great job finishing it up, and I can't help but show it off for them.


Starting from the back porch/utility room:


Leading into the kitchen: 


Which sends you to, the restroom (no, I don't want a bathroom right outside of my kitchen either, but this is a rental...let's not be TOO picky!):


From there, you can see the hallway:


The hallway leads to the living room:


And, of course, the three bedrooms:


Hellooooo, huge closet!

Bedroom 2

Bedroom 3


The house is available for rent now, and once it starts getting really cold out, and his business dies down for the year, my brother will be redoing the exterior of the house.  I think it turned out great.  Really great.  Completely amazing to have been there and seen (and SMELLED) the before of this house, to see how it is now.


Stay tuned.  Soon I'm going to give you my take on Miss Mustard Seed's (and Liz's from The Midwest Cottage) famous paper ornaments, and wreaths-- perfect for the Holiday season!


Tuesday, November 22, 2011

Let's talk: Antibes Green

Last week, I finally ended a battle that had been ongoing for far too long.  Before I opened my booth, I had picked up a cute little dresser with my brother on our way to a haunted house in St. Louis.  It was very plain with just a design nicely painted on one drawer, and had sweet little chunky feet.


I thought it would be fun to do it in a bright, fun color.  I pulled out my brand new can of Antibes green and got to work.


Two coats later, I had what I referred to as Frankenstein (it was Halloween...seriously, that long ago).  That thing was GREEN.  Lime green.  Blinding.  I'd read a lot about how dark wax can really tone it down, so I distressed it and went over it with clear, and then a pretty heavy coat of dark wax.  I had envisioned it coming out like the example piece on Annie Sloan's website.


It didn't.  The dark wax started dragging (which you must know is impossible to fix once it's happened...touch ups fix that area but make the surrounding ones darker, so it's still noticeable, and just looks dirty).  I painted over the areas that dragged with green, again...and tried, again.  It didn't work, again.  So I mixed some Paris grey with a little green because I REALLY wanted this darn dresser to be green, but not GREEN.  I painted it, and hated it too.  Augh.

At this point, I was ready to throw the thing in the ally.  Ever have one of those?  I was so mad at it, and the amount of this expensive paint and wax I had wasted on it!  I decided it must not want to be any shade of green, so I pulled out my old white, slapped two coats on, and distressed it.


And then the green wasn't so bad, because where I distressed, this little bit of green peeked through like a happy surprise on a plain canvas.


So, I thought I'd give Antibes green another shot...on a smaller piece.  You know, maybe I had just been doing something really wrong?  I picked up a little half moon table that had been painted hunter green with flowers all over it's top as the candidate. I stripped and stained the top, and painted the bottom and did the same clear and dark wax as on the dresser.  My thinking was that with a smaller area, the green wouldn't be so overwhelming.


Well, it still is.  It turned out okay, but it's still pretty in-your-face intense, and not really my cup of tea, but I could see it sitting on someone's front porch nestled between two chairs.  I think I would like it if it were more apple colored than lime.  If I had more colors, I'm sure I could mix it to get it where I like, but I don't honestly think I'll order Antibes again.  

What are your thoughts on the color?  Have you used it on a piece and hated it?  Loved it?  My google search turned out pretty limited examples of pieces painted with it, so if you've done something in Antibes I want to see it!


See you soon,


Sharing at:
Savy Southern Style
Domestically Speaking
Miss Mustard Seed's Furniture Feature Friday